Tuesday, August 14, 2012

My Watermelon Tastes Like Garlic!

The other day, I was cutting up some beautiful watermelon that I purchased from the store. It was juicy, round, and that perfect pink that you only find in the good ones. Of course, I was cutting the fruit atop my "cutting station" that I rigged up on my island:

I went to take a much anticipated bite and immediately spit it out. My watermelon tasted like garlic! It was seriously one of the most nasty things, not to mention disappointing. I knew it was time for the old blocks to get a deep clean. If your food is taking on uncharacteristic flavors, it might be time for you to give your cutting boards a clean as well. It is super easy to remove odors and stains, and all you need are a few supplies that most of you probably have lying around:

Step 1. Gently wash your boards with a mild soap to remove any residue or surface stains. 

Step 2. Dry your boards, being sure to remove as much water as possible to prevent warping. (Tip: you should not wash your wooden cutting boards after each use. simply wipe them down and wait to do a full wash when deep cleaning.)

Step 3. Cut your lemon in half and fold your paper towel in quarters. Be sure to use a strong paper towel.


Step 4. Place your lemon half onto the folded paper towel, face down.


Step 5. Fold up the corners of the paper towel over the lemon to form a pouch. This will keep the seeds and pulp from spreading all over your cutting board.


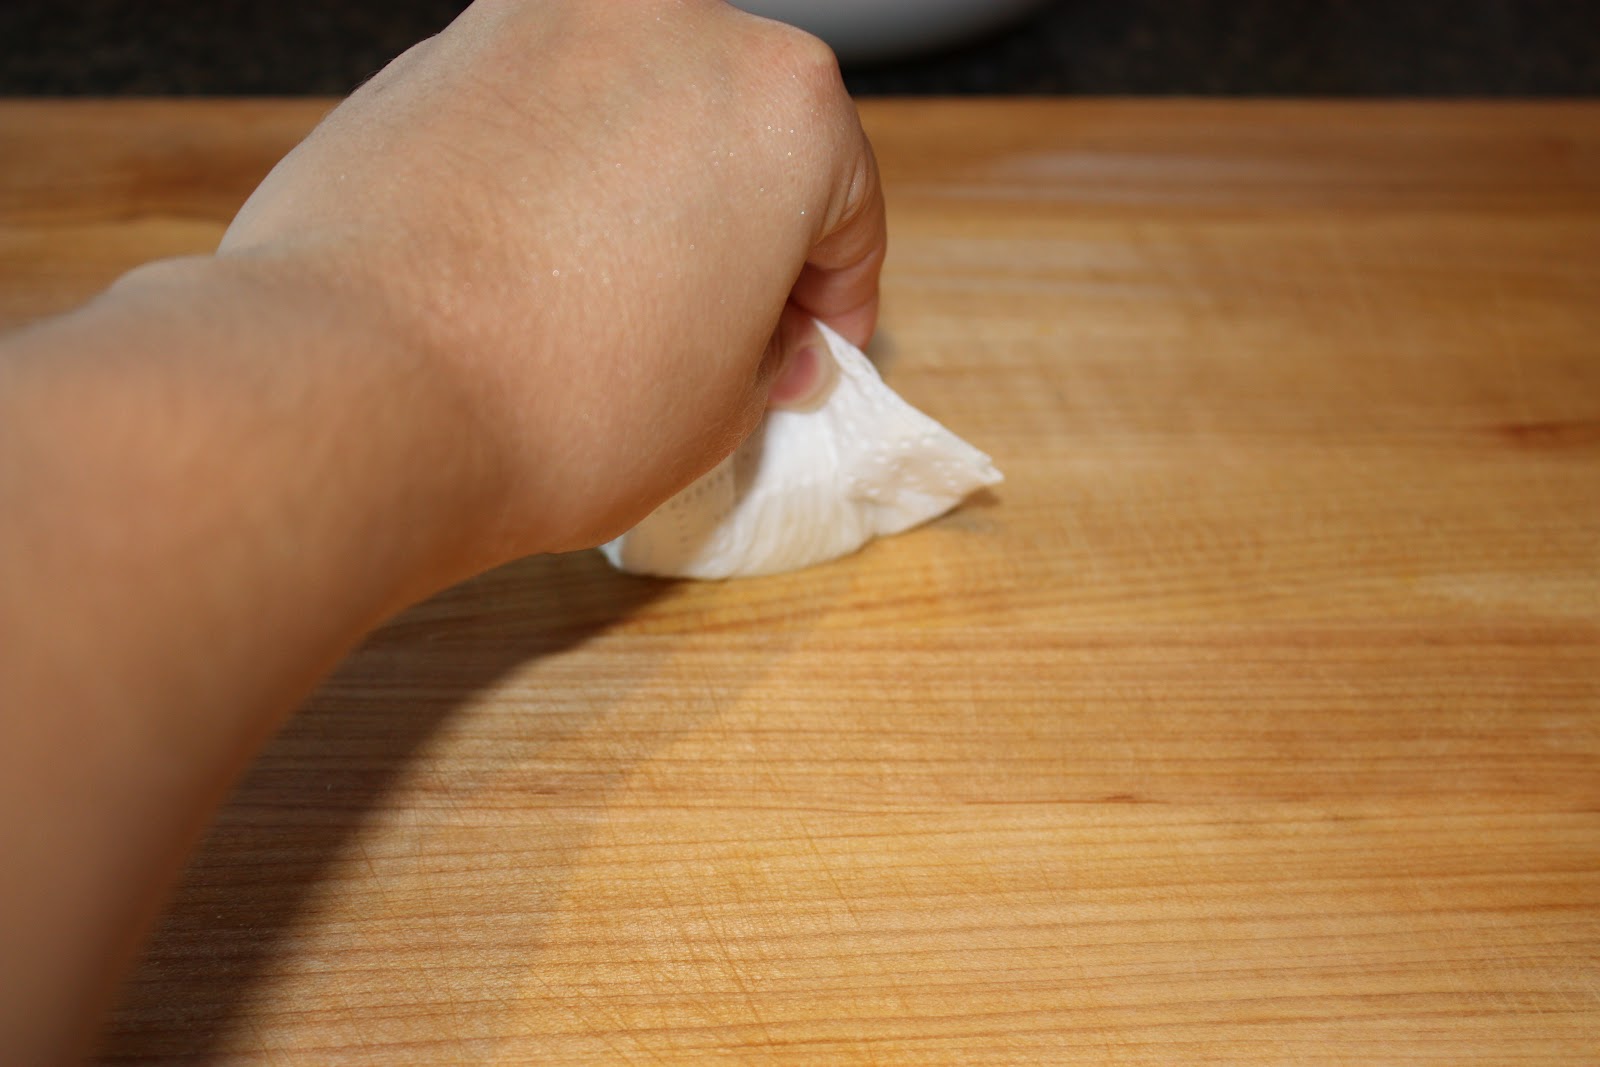
Step 6. Face-down, rub the lemon across the cutting board, squeezing gently to release the lemon juice. Do not rub too furiously, or the paper towel will rip, and lemon gunk will scatter across your board. 


Step 7. With the lemon juice on the surface, place the board outside in direct sunlight. (Don't worry if you do not have direct sunlight, we don't because we live in an apartment and our outdoor space consists of a mini-patio. Indirect sunlight will work fine.) Leave the board in the sun for at least 3 hours, or until the odor and stains are removed. The lemon juice helps with the bleaching process, and gives the board a fresh smell.

Step 8. When your cutting board is done sunbathing, bring it back inside. (Fun fact: the sun is a natural bleacher and removes stains, odor, and bacteria better than anything else! Oh, and, it's free!)

Step 9. This is a bonus step. If you regularly use your cutting boards, or if you have invested in quality ones, it is worth taking this extra step to moisturize them. Grab some mineral oil and a paper towel. Mineral oil is wonderful because it penetrates deep into the wood, and helps to prevent dryness, splitting, and cracking. You do not have to use this exact brand, but whichever you choose, be sure that the oil is colorless, odorless, and tasteless, otherwise your surface may become rancid. Never use olive or vegetable oils. 

Step 10. Squirt a few drops of oil onto the board, and spread it out evenly over the surface. Rub with your towel to ensure the oil sinks deep into the wood.


See the difference?! You are all done, my friend. A clean surface awaits anything that requires cutting and slicing...including my new head of watermelon! 

Wednesday, August 8, 2012

Craftgawker


DIY party animal magnets are chic and fun all at the same time.
So as I wait patiently for my sweet boy to arrive, I have been mustering up the courage to tackle some projects for him. I know once he gets here, my time will be limited, so I am getting a head start. Here is an AMAZING website I found, and have not been able to stop browsing for mmm, about two weeks :) Warning: highly addictive...maybe more so than pinterest!


P.S. There are also sister sites: (be careful)

Monday, August 6, 2012

Eli's Nursery: Sneak Preview


The need to nest is serious ya'll. I'm convinced it's caused by some sort of weird hormone...like most things in pregnancy. Being type A to begin with is only magnifying the effects of the nesting hormone surges. Here are a few sneak peaks of what I have compiled so far.


Stay tuned for more, oh and some type AA organization ideas :)

Friday, July 27, 2012

Winner Winner Chicken Dinner


Ok, I LOVE me some fried chicken...I don't, however, love the calories that come with each piece. I am a big fan of Ellie Krieger, and she has this recipe for oven fried chicken. I was a little reluctant to try it because I didn't want to get my heart set on the taste of fried chicken, and then be disappointed. But, this recipe is absolutely divine. You bathe the chicken in buttermilk, glaze it with honey, and then dunk it into a crunchy mixture of cornflakes and seasonings. The result: a sweet/savory combination with a hint of spice. It has one of those flavors that I know I will crave again (and this is not just the pregnancy talking).

You might be ogling over the heaping pile of cheesiness to the left of that golden chicken...I would. That's why I am going to include that recipe as well. I have made over five different mac and cheese recipes searching for the perfect one. Some have proven to be flavorful, but have lacked the silky texture. Others are silky, but lack deep flavor. This one is smooth in texture, light in color, and has a sharp cheesy taste like all mac and cheese should.  It has earned a permanent spot in my "sides" rotation. Enjoy!

P.S. Don't forget the sweet tea :)

Honey-Crisp Oven-Fried Chicken 

4 skinless bone-in chicken thighs (I also included drumsticks)
2/3 cup low-fat buttermilk (I placed mine in a bowl and poured till it was covered)
4 cups cornflakes cereal (Don't buy the frosted flakes!)
1/2 teaspoon paprika
1/2 teaspoon garlic powder
1/2 teaspoon kosher salt
1/4 teaspoon freshly ground black pepper
1/4 teaspoon cayenne pepper
Olive oil cooking spray
2 tablespoons honey

Place the chicken in a bowl and cover with buttermilk. Marinate in the refrigerator for at least 1 hour and up to 4 hours.


Place the cornflakes in a food processor and process until crumbs form.


Transfer to a shallow dish and mix in the paprika, garlic powder, salt, black pepper, and cayenne pepper.


Preheat the oven to 350 degrees. Spray a baking sheet with cooking spray. Remove the chicken from the buttermilk, shaking off excess. Discard the remaining buttermilk. Brush each piece of chicken with honey.


Dip the glazed chicken in the cornflake crumbs, pressing hard so the crumbs adhere to the chicken. Place each piece on the prepared baking sheet. Lightly spray the top of each chicken thigh with cooking spray. Bake until the chicken is crisped and cooked through, 45 to 50 minutes.


Now for the gooey stuff...

Panera's Stove Top Mac and Cheese

16 oz pasta shells, or any shape you like (I used partial wheat pasta and it turned out great)
4 tablespoons unsalted butter
1/3 cup all purpose flour
2 cups half and half
1/2 cup heavy cream
4 oz white American cheese, chopped or torn into pieces (I used Walmart brand individually wrapped singles)
8 oz extra sharp white cheddar cheese, shredded (buy the block in the nice cheese section)
1 teaspoon dijon mustard
1 teaspoon kosher salt
1/4 teaspoon hot sauce (such as Frank's)

In a large pot, cook pasta according to package directions. Drain well, DO NOT rinse.

While the pasta cooks, melt the butter in a 4-quart sauce pan over medium heat. When the butter has melted and has started to bubble, whisk in the flour, stirring constantly for 2 minutes. Gradually whisk in the half and half and heavy cream until no lumps remain. Reduce the heat to medium-low and cook milk mixture, whisking often, until it thickens, about 6-8 minutes.

Remove the sauce from the heat and, by the handful, stir in cheeses, allowing all of the cheese to melt into the sauce before adding more. Stir in the mustard, salt, and hot sauce. Return the sauce pan to the heat and stir in the pasta. Be sure to thoroughly coat the pasta. Cook for 1-2 minutes until heated through.

Wednesday, July 25, 2012

Crinkle Tag Toy


Being a fabulous sewer has always been a dream of mine. My mom and sister have become expert sewers, but I am still very much a novice. We all have to start somewhere right? I have, so far, managed to grasp the basic functions of the machine, and have mastered straight lines. When project hunting, I still gravitate towards items that are square or rectangular in shape, and don't involve a lot of fancy sewing methods. I recently came across a tutorial for a crinkle tag toy and thought, hey, this I can do! Supposedly, tag blankets have been around for a while...they are simply fabric with ribbon looped in various spots around the boarder and, babies love to chew on them. Babies go crazy over crinkle material/stuffing (whatever it is) too. They love the sound, and I'm guessing the weird texture it gives. Put tags and crinkle together and you have got a pretty awesome toy! This project is really simple, all you need is a few cute, coordinating fabric scraps, ribbon scraps, and you can make this precious little toy too!

Gather materials. You do not have to make the toy quilt-style as I did, you can use just one piece of fabric. But, I think all of the different patterns add interest and makes it look really fun.


Cut nine pieces of fabric, each 3.5" by 4.5". If you want to use some fabric twice, cut 4" by 7" rectangles, then simple cut them in half.


Experiment with a few pieces of rick rack, and sew them onto the fabric rectangles.


Sew the rectangles together with right sides facing; press open.


Then sew the rows together, right sides facing; press open.


Now, pin on your ribbon loops. Get creative and have fun placing them around the boarder!


Sew the ribbons in place and remove the pins.


Now for the crunchy part! Find something around your house that you don't need and cut it up. I used a  package that held dental picks...but you can really use anything...a wipes case would work well. Don't worry if your wrapper is smaller than your fabric, it will crunch just fine! I wanted the toy to be a little plush, so I took a piece of felt, and sewed the crunchy wrapper to it.


Pin the felt fabric to back fabric and sew again.


If you don't want your toy to be super crunchy and loud, you could also cut strips, circles, or random patches to attach to the felt.


Put the right sides together, and sew around leaving about a 6" opening on the side. Clip the corners and trim up the trimmings. Flip her inside out, and secure the opening.


Press flat, and do a finishing top seam all around the boarder. You're all done! Now go find yourself a baby to give this too, or wait (patiently) like me for yours to finish cooking :)


Sunday, July 22, 2012

Steak Tacos with Cucumber Avocado Salsa


When Drew and I lived in our first apartment, I experimented with a lot of new recipes. This one was, and still is one of our original favorites. It's quick, easy, and SO delicious. I love to make it in the summer because of all the fresh and colorful ingredients.

Steak

1 tablespoon chili powder
2 cloves garlic, minced
1/4 teaspoon ground cinnamon
1/4 teaspoon salt
Pinch of cayenne pepper
1 1/4 pounds top sirloin steaks (about 1 1/4 inches thick)
1 tablespoon butter
Twelve 6-inch diameter wheat, or white tortillas
3 cups shredded red cabbage
1/2 cup chopped fresh cilantro
1 lime, cut into wedges
1/2 cup light sour cream
Cucumber-Avocado Salsa (recipe follows)

Melt 1 tablespoon butter in a large nonstick skillet over medium high heat.

In a gallon sized ziplock bag, combine chili powder, garlic, cinnamon, salt, and cayenne pepper. Cut the steak into thin slices. Place steak in bag, seal, and shake to coat.

Saute the steak for about 3 minutes per side, turning once, for medium or to your desired degree of doneness.

Warm the tortillas by placing 6 at a time between two damp paper towels and microwaving for 30 seconds. Wrap in a cloth napkin to keep warm.

Place the steak, warm tortillas, cabbage, cilantro, lime wedges, sour cream, and salsa in serving dishes and let your guests make their own tacos at the table.

Cucumber-Avocado Salsa

1 medium English cucumber, seeded and diced
2 medium firm-ripe avocados peeled, pitted, and diced
1/2 red onion small diced
Juice of 2 limes (about 1/4 cup)
Salt to taste
1/4 cup chopped fresh cilantro
3 jalapeƱo peppers, seeded and finely chopped, or to taste

Combine all the ingredients in a medium bowl and toss gently to combine. Serve within an hour of preparing.

Tuesday, July 17, 2012

Pregnancy Secrets Revealed Part II


4. Morning sickness?

Because of my notorious sensitive stomach, I assumed I would have a bad case of morning sickness during my pregnancy. People would share horror stories of women who were glued to the toilet for 9 whole months...I figured, that would be my fate. I was told, "Don't worry, morning sickness means the baby is healthy, it's a good sign." Most women, I imagined, experienced morning sickness, and it was just one of those pregnancy woes that would eventually pass.

Into my second month of pregnancy, I was sailing smoothly along, with only small traces of nausea, and not one trip to the john. I began to get concerned. Was the baby healthy? Were my hormone levels on target? I found myself almost wishing that I would get sick, just to confirm that I was indeed still pregnant.

After doing my own research, I found a few interesting facts that eased my mind:

-It is called "morning sickness," but most women who experience nausea and vomiting do so throughout the day, or at any time.

-Studies show that nearly three quarters of all expecting mothers experience nausea and vomiting,   which means a little more than twenty-five percent of expectant women don't. 

-Nausea and vomiting do not always correlate with a healthier fetus. Women with normal hormone levels may experience little or no sickness at all.

-Every pregnancy is different, including your own pregnancies with multiple children. You may experience nausea and vomiting during your first pregnancy, and none with your next child.

Bottom line: if you experience light or no nausea at all, it is perfectly normal. Do not worry yourself to death thinking that something is wrong with you or your baby. Schedule regular doctor appointments, keep taking those prenatal vitamins, and trust that your body knows what to do.

5. Spotting and or cramping.

Spotting and cramping are two scary symptoms to a pregnant woman. However, they don't always need to be. Spotting is not always a definite sign that something's wrong with your pregnancy. 1 in 5 women experience some bleeding during pregnancy, and most go on to have healthy babies. If you notice light spotting, the same kind you have at the start and finish of your period, you are probably just fine. This bleeding is commonly caused by the following:

-Implantation of the embryo (see implantation bleeding on my first post).
-Intercourse or an internal pelvic exam, such as a pap smear.
-Infection of the vagina or cervix.

Cramping is something that is completely normal during your entire pregnancy. Your body is making big changes, and along with those changes, you may feel uncomfortable at times. Early in my pregnancy, I experienced light cramping in my abdominal region. They were always much lighter than period cramps, but still uncomfortable. When my stomach started to expand, around 4 months, I began to feel "round ligament pain" on the lower sides of my abdomen. This is extremely common and perfectly normal. Round ligament pain is like growing pains during pregnancy. Your muscles and ligaments stretch to support the growth of your uterus. It can feel different, the pain may be crampy, achy, sharp or stabbing. It may come on randomly, or may hit when you cough or sneeze, or even when you get up too quickly. This pain may be accompanied with back pain as well. Because your stomach is growing forward, your back is being arched inward, the result can be painful backaches.

Bottom line: spotting and cramping are symptoms almost every pregnant woman experiences. They are completely normal and should not be of concern as long as they both are occasional, and are not accompanied by one another, like during your period.

6. Don't let worry rob your joy.

In my opinion, the first trimester is the most mentally challenging of all the trimesters. Excitement abounds, but the reality of being pregnant is hard to accept at times. I found myself always second guessing if I was really pregnant, if the baby was really growing, and if I was doing everything right. I worried every day that I would lose the baby for whatever reason, and what would I do then? All of the symptoms, both good and bad would freak me out, consume me even. I told my husband that during this trimester, you experience most of the bad with little of the good. You get some of the most severe symptoms, but aren't able to see your belly grown, or feel your baby move. All of my worry robbed me of the joyful blessing that was nested in me. I voiced my concerns to my Mom one day, and she told me something that will stick with me forever. She said, "Wouldn't you rather celebrate and love this baby each day that it is alive, than worry about losing it?" Her words spoke truth into my heart. I did want to love my baby, I wanted to fill myself with love, joy, gratitude, and peace, not worry and doubt.

From then on, I took one day at a time, loving and praying over my baby. I praised God for trusting me with a child, and I took care of my body the best I could. I trusted that the baby's life was out of my control. God gently spoke to me one day, and reminded me that while this was my child, it was first and foremost his. He had a plan already set in history for him or her. I needed to give him control, and be thankful for each day that this baby grew inside of me.

7. The glow.

I'm not quite sure where people came up with the pregnancy glow, but I am here to honestly tell you not to expect one in your first trimester. Your hormones are going to be so out of control that, chances are, your face will more likely be covered with acne like when you hit puberty rather than a sunny glow. I don't want to scare those of you who are not yet pregnant, but this is the reality for a lot of expecting mommies. The good news is that there are a lot of safe facial cleansers you can use to remedy the disaster, I used Proactive and it seemed to help. Be cautious of really strong products, especially prescription ones, and always consult your doctor before you use something. Chemicals can be absorbed through your skin and reach the fetus.

The good news is that your acne will probably subside sometime in your second trimester, around the time that your hormones level off. I believe this is when, many women look and feel their best.

8. Being informed is good...but don't let information consume you.
When you are pregnant, the world is at your fingertips. Unlike our mothers and grandmothers before us, we have access to millions of books written on pregnancy, babies, and parenting, and even more information spread across the internet. This unlimited access to information is both a blessing and a curse. I admit that even before I became pregnant, and then well into my first trimester, I read up on various topics and became addicted to the knowledge. However, I also found that through all of this research and reading, I became more concerned about things that I had never paid mind to before. I believe there is a healthy balance that we must reach during our pregnancies. Being informed and knowledgeable is important, but too much information can cause harm. Choose wisely the topics you read, and always take them with a grain of salt. Just because information is written in one place does not make it law or fact. Every pregnancy is different, and every baby is different. The best advice I can give is to select one or two reputable books, and then let the rest be. Trust your body, and be in touch with your doctor/midwife/doula/friends/family about other concerns.

Two books that I would strongly recommend are:
-What to Expect When You're Expecting
-Spiritual Led Parenting